Manipulating OpenCV images using NumPy arrays
This is the first of a series of pratical examples of image processing in Python using OpenCV. We will se how simple it is to operate on image files.
An image is a function f of two variables (e.g. x and y) which correspond to two spatial dimensions (height and width). A digital image is obtained from sampling and quantization processes. After these processes, the image can be represented by a matriz of shape M x N (M rows and N columns) in which each element is a pixel (picture element) that can only assume a finite amount L of quantization levels. In general, this image representation uses integers between 0 and L-1 to associate the brightness of each pixel with its corresponding level. In the usual 8-bit quantization, for instance, L = 256 levels and each pixel can assume values between 0 and 255 inclusive.
In the case of color images, three digital images on the red, green and blue (RGB) channels are superimposed. Each pixel then corresponds to a sequence of three integers. For instance, an 8-bit pixel with values (0,255,0) corresponds to pure green, while (127,127,127) corresponds to gray50 (“middle gray”).
When using OpenCV features in Python, we represent images as Numpy arrays.
If we use the 8-bit integer representation, it is convenient to give the array type as uint8, but during arithmetic manipulations the arrays may eventually assume floating point types for representing real numbers.
Pixel manipulation in Python is therefore identical to the manipulation of elements in a multidimensional array.
We will explore this in the simple example below.
Negative of an image
The negative of an image $f$ is the image $g$ of the same shape with complementary intensity to $f$:
\[g(x,y)=(L-1)-f(x,y)\]
In the case of color digital images, the above operation is performed on each pixel of each of the three channels of the original image $f$. Let’s see how we do this basic operation in Python.
First, OpenCV provides us with a function for reading image files (imread) which takes, in addition to the file name, a flag indicating how the image should be stored (e.g. in grayscale or color).
To read a file provided by the command line when running the program, we can do the following:
1
2
3
4
5
import sys
import cv2

filename = sys.argv[1]
image = cv2.imread(filename, cv2.IMREAD_COLOR)
Thanks to the ability of NumPy to perform vectorized operations, we can find the negative of the complete image with a single line:
1
negative = 255 - image
Likewise, if we wish to perform this operation exclusively within a rectangular sub-region of the image, we can use the slicing technique to access only the desired elements of the array. For example, consider that the coordinates of the upper left and lower right corners of the region of interest will be provided by the user during the program execution. We can solve this problem in a few lines as follows:
1
2
3
4
5
6
7
8
9
10
11
12
13
14
15
16
import sys
import cv2

xi, yi = input('pi: ').split(',')
xi = int(xi)
yi = int(yi)

xj, yj = input('pj: ').split(',')
xj = int(xj)
yj = int(yj)

filename = sys.argv[1]
image = cv2.imread(filename, cv2.IMREAD_COLOR)
image[xi:xj, yi:yj] = 255 - image[xi:xj, yi:yj]
cv2.imshow('negative', image)
cv2.waitKey()
The imshow function opens a screen identified by the title (provided in the first argument) and shows the image (second argument) on that screen.
The waitKey function, as the name indicates, keeps the program running (and therefore the screen open) until a key is pressed on the keyboard.
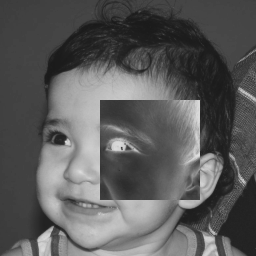
A possible result of running the program is as follows:
foo@bar:~$ python3 regions.py biel.png
pi: 100, 100
pj: 200, 200
Interactive version
OpenCV allows real-time user interaction with the screens generated by the interface (imshow) through events that correspond to actions performed on the mouse or keyboard.
We can use this to interactively define, by dragging the mouse, the rectangular region that we want to invert.
For this, we need to define a callback function that interprets the possible events performed with the mouse and shows the result in real time:
1
2
3
4
5
6
7
8
9
10
11
12
13
14
15
16
17
18
19
20
21
22
23
24
25
import sys
import cv2

filename = sys.argv[1]
original = cv2.imread(filename, cv2.IMREAD_COLOR)
negative = original.copy()

drawing = False
xo, yo = -1, -1

def invert(event, x, y, flags, param):
    global drawing, xo, yo, negative
    if event == cv2.EVENT_LBUTTONDOWN:
        drawing = True
        xo, yo = x, y
    if event == cv2.EVENT_MOUSEMOVE:
        if drawing:
            xi, xj = sorted([xo, x])
            yi, yj = sorted([yo, y])
            negative[yi:yj, xi:xj] = 255 - original[yi:yj, xi:xj]
    if event == cv2.EVENT_LBUTTONUP:
        drawing = False
    if event == cv2.EVENT_RBUTTONDOWN:
        drawing = False
        negative = original.copy()
In the invert function code above, we consider four possible operations with the mouse: EVENT_LBUTTONDOWN corresponds to pressing the left mouse button and will mark the starting point of the rectangular region (xo, yo).
The boolean flag drawing indicates that mouse drag (EVENT_MOUSEMOVE) will be considered as part of the drawing of the rectangle; if drawing is true, we establish the current position of the mouse (x, y) and the initial position stored in (xo, yo) as the two corners of the rectangle (we need to make sure they are sorted with the sorted function).
If we release the left button, EVENT_LBUTTONUP will be emitted and drawing will become false.
Also, by pressing the right button (EVENT_RBUTTONDOWN) we restore the image to its original state.
To use this callback function on an OpenCV screen, we can create it blank with the namedWindow function and then use setMouseCallBack as follows:
1
2
cv2.namedWindow('negative')
cv2.setMouseCallback('negative', invert)
Finally, we keep the program in an infinite loop of imshow until the ESC key (27 in the ASCII table) is pressed and identified by the waitKey function.
Therefore, the full script for the interactive version of our little problem is something like this:
1
2
3
4
5
6
7
8
9
10
11
12
13
14
15
16
17
18
19
20
21
22
23
24
25
26
27
28
29
30
31
32
33
import sys
import cv2

filename = sys.argv[1]
original = cv2.imread(filename, cv2.IMREAD_COLOR)
negative = original.copy()

drawing = False
xo, yo = -1, -1

def invert(event, x, y, flags, param):
    global drawing, xo, yo, negative
    if event == cv2.EVENT_LBUTTONDOWN:
        drawing = True
        xo, yo = x, y
    if event == cv2.EVENT_MOUSEMOVE:
        if drawing:
            xi, xj = sorted([xo, x])
            yi, yj = sorted([yo, y])
            negative[yi:yj, xi:xj] = 255 - original[yi:yj, xi:xj]
    if event == cv2.EVENT_LBUTTONUP:
        drawing = False
    if event == cv2.EVENT_RBUTTONDOWN:
        drawing = False
        negative = original.copy()

cv2.namedWindow('negative')
cv2.setMouseCallback('negative', invert)

while True:
    cv2.imshow('negative', negative)
    if cv2.waitKey(20) & 0xFF == 27:
        break
And a small GIF illustrating the execution of the program is shown below.
Regions of Interest
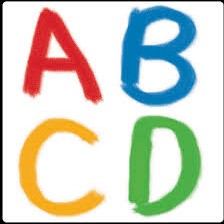
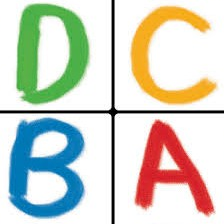
These rectangular sub-regions we dealt with in the previous section are known as regions of interest (ROI). A very common example of ROI manipulation is the swapping of the quadrants of an image. If we know the shape of the image in pixels, this procedure becomes merely another slicing application.
1
2
3
4
5
6
import sys
import cv2

filename = sys.argv[1]
orig = cv2.imread(filename, cv2.IMREAD_COLOR)
M, N = orig.shape[:2]
The shape attribute of a color digital image is going to be a tuple of three form elements (M, N, 3), where M and N correspond to the number of rows and columns of the image, respectively.
Using the integer division operator // and assuming M and N are even integers so that all four quadrants have identical shapes, we can directly assign the quadrants of the original image to a target image of the same size:
1
2
3
4
5
6
7
8
9
dest = orig.copy()
dest[:M//2, :N//2] = orig[M//2:, N//2:]
dest[:M//2, N//2:] = orig[M//2:, :N//2]
dest[M//2:, :N//2] = orig[:M//2, N//2:]
dest[M//2:, N//2:] = orig[:M//2, :N//2]

cv2.imshow('original', orig)
cv2.imshow('swapped', dest)
cv2.waitKey()
To clearly illustrate the result obtained by swapping quadrants, here is an example of orig and dest: