Using the flood-fill algorithm to label objects in binary images
Image segmentation
One of the main steps in computer vision is image segmentation. In this step the image is subdivided into connected regions, which can represent individual objects, for example. This requires labeling the pixels in the image so that pixels of the same label are grouped together in sets based on a property of interest.
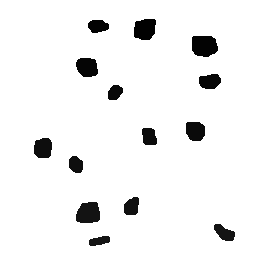
In this tutorial we are going to consider that some pre-processing (e.g. a threshold) has already been done on the image in order to make it binary, i.e. with only black and white pixels. For this we will use the image below, artificially created to simulate a microscope image of several bubble-shaped “cells” or “organisms”.
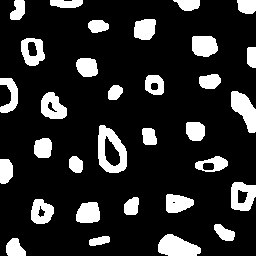
Looking at the image above, we notice that each individual blob is a connected region of white pixels. How do we count the number of blobs in the image? Well, if each one of them was associated with consecutive integer labels, the last blob to be labeled would have the total amount of blobs as its label. From this general idea, we can count the connected white regions of any binary image.
Filling regions: flood-fill kicks in
And how can this labeling be done? Enter the flood-fill algorithm. The idea behind it is quite simple and resembles the functionality of the “ink bucket” of image editors; from a source pixel, all its neighbours contained in the same connected region are filled with the same value. This can be easily implemented using the usual graph search algorithms such as breadth-first search (BFS) and depth-first search (DFS).
In OpenCV, this algorithm is implemented in the floodFill function, which takes as arguments the image, an optional mask with obstacles to filling, the coordinates of a seed start seedPoint and the value newVal to be used for filling.
Optionally, we could also specify maximal lower/upper brightness differences between neighbouring pixels belonging to the same component (loDiff and upDiff), or flags that specify the type of connectivity to be considered, but in our case (binary images) these parameters will not be useful.
Knowing this, in a few lines we can find out how many objects there are in the image:
1
2
3
4
5
6
7
8
9
10
11
12
13
import sys
import cv2

filename = sys.argv[1]
image = cv2.imread(filename, cv2.IMREAD_GRAYSCALE)
M, N = image.shape

n_objects = 0
for i in range(M):
    for j in range(N):
        if image[i, j] == 255:
            n_objects += 1
            cv2.floodFill(image, None, (j, i), n_objects)
Watch out! Sneakily we are assuming that, as the number of blobs seems to be much lower than 256, we are not going to have problems of ambiguity when looking for the as yet unlabeled blobs (pixels of brightness 255); if we needed to take this into account, it would suffice to change the data type of the original image and initially assign all white pixels an “unreachable” value (negative, fractional, or very high values, for example). There’s no problem doing this since we’re already at an abstraction level below the actual image visualization!
Improved counting: with or without holes?
One of the usual problems involving image segmentation is the differentiation of scene elements. In other words, sometimes counting the occurrences of all objects indiscriminately does not help to answer our question. We can improve our counting algorithm for the same example of microscopic blobs, now trying to count separately the number of blobs with or without “holes” inside them.
We are not interested in blobs touching the edges of the image, since we cannot know for sure whether they have holes or not.
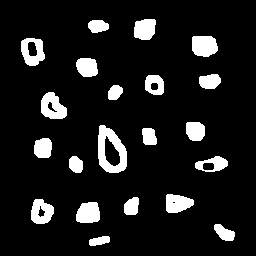
The first thing to do is thus to fill all the objects on the edge of the image with the background tone 0.
In other words, we simply call floodFill on the pixels on the edge of the image (columns 0 and N-1, rows 0 and M-1) that have object tone 255:
1
2
3
4
5
6
7
8
for i in range(M):
    for j in [0, N-1]:
        if image[i, j] == 255:
            cv2.floodFill(image, None, (j, i), 0)
for i in [0, M-1]:
    for j in range(N):
        if image[i, j] == 255:
            cv2.floodFill(image, None, (j, i), 0)
With the remaining blobs, we are going to label them all using the exact same code as before.
Now by using floodFill on one of the edge pixels we can “paint” the background white.
Any pixel that still has a background tone of 0 belongs to a hole inside a blob:
1
cv2.floodFill(image, None, (0, 0), 255)
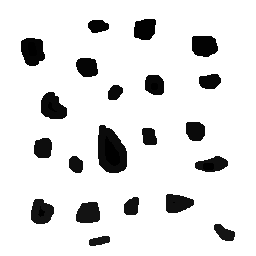
Note in the visualization above that each blob has a very dark gray tone, since we are labeling with consecutive integers.
Now it’s easy to count the number of blobs with holes by simply counting the holes!
Let’s fill each one of them with floodFill using the same process once again.
However, to avoid repeatedly counting blobs that may have more than one hole, we should fill the hole together with its corresponding blob, so that any subsequent hole can be filled without being counted.
In other words:
1
2
3
4
5
6
7
8
n_holes = 0
for i in range(M):
    for j in range(N):
        if image[i, j] == 0:
            cv2.floodFill(image, None, (j, i), 255)
            if 0 < image[i, j-1] < 255:
                n_holes += 1
                cv2.floodFill(image, None, (j-1, i), 255)
The above code looks for holes (any black pixel from the original background) filling them with the new white background (255).
In the case where this hole belongs to a blob that has not yet been counted, the immediately preceding neighbour of the first black pixel identified must be an intermediate shade of gray (from a label), so we also call floodFill in this pixel with 255; if this is not the case, it means that the blob has already been counted and we don’t need to do anything else.
The result of this procedure leaves only the blobs without holes with a shade different from the white that was used to “erase” the blobs with holes as they were being counted.
Putting it all together
The full code and its running example would be something like that:
1
2
3
4
5
6
7
8
9
10
11
12
13
14
15
16
17
18
19
20
21
22
23
24
25
26
27
28
29
30
31
32
33
34
35
36
37
38
39
40
41
42
import sys
import cv2

filename = sys.argv[1]
image = cv2.imread(filename, cv2.IMREAD_GRAYSCALE)

M, N = image.shape

# remove the blobs that touch the edges
for i in range(M):
    for j in [0, N-1]:
        if image[i, j] == 255:
            cv2.floodFill(image, None, (j, i), 0)
for i in [0, M-1]:
    for j in range(N):
        if image[i, j] == 255:
            cv2.floodFill(image, None, (j, i), 0)

# count every blob
n_objects = 0
for i in range(M):
    for j in range(N):
        if image[i, j] == 255:
            n_objects += 1
            cv2.floodFill(image, None, (j, i), n_objects)

# white background
cv2.floodFill(image, None, (0, 0), 255)

# count the blobs with holes
n_holes = 0
for i in range(M):
    for j in range(N):
        if image[i, j] == 0:
            if 0 < image[i, j-1] < 255:
                n_holes += 1
                cv2.floodFill(image, None, (j-1, i), 255)
            cv2.floodFill(image, None, (j, i), 255)

print('  TOTAL BLOBS:', n_objects)
print('   WITH HOLES:', n_holes)
print('WITHOUT HOLES:', n_objects-n_holes)
Output:
foo@bar:~$ python labeling.py blobs.png
  TOTAL BLOBS: 21
   WITH HOLES: 7
WITHOUT HOLES: 14